

Oh, my friends, the holidays are officially upon us, which means my kitchen is running almost entirely on sprinkles, melted chocolate, and sheer excitement! I love making things that look complicated but are secretly so easy, and nothing says joyful holiday chaos quite like a tray of these adorable **Grinch Oreo Balls**. Seriously, if you need a showstopper that requires zero oven time—which, let’s be honest, we all need more of in December—this is it! These little truffles are plump, chocolatey, incredibly satisfying, and that bright green color just screams Christmas fun.

When I was little, my favorite part of the season was the cookie exchange at school, and these **Grinch Oreo Balls** would have won every “Cutest Dessert” ribbon, hands down. They hit that perfect sweet spot of being deeply chocolatey (**Oreo Truffle Recipes** territory) while also being totally whimsical and photo-ready. Don’t you worry about presentation being too fussy; they’re surprisingly simple to pull together, even if you’re making a huge batch for a party or swapping them at a **Christmas cookie exchange**!
- Why These Grinch Oreo Balls Are Your New Favorite Holiday Treat
- Gathering Ingredients for Grinch Oreo Balls
- Step-by-Step Instructions for Making Grinch Oreo Balls
- Tips for Perfect Grinch Oreo Balls Every Time
- Storage and Making Ahead for Easy Christmas Snacks
- Serving Suggestions for Grinch Oreo Balls
- Frequently Asked Questions About Grinch Oreo Balls
- Estimated Nutritional Data for Grinch Oreo Balls
- Share Your Grinch Inspired Recipes Creations
Why These Grinch Oreo Balls Are Your New Favorite Holiday Treat
I’m telling you, these **Grinch Oreo Balls** are going to save your holiday baking sanity. Since they are naturally no-bake, you can make them one day and they are just as delicious the next, which is a miracle when your oven is busy with roasts and pies! They bring such a playful, high-impact look to any dessert platter without any fussy piping bags required.
- They are absolutely No Bake Oreo Balls—pop them in the fridge and they firm up like magic!
- They are fantastic Kid Friendly Christmas Desserts because the kids can totally help roll the dough.
- Their bright green color and tiny red heart give them massive visual impact for the table.
If you’re looking for something sturdy to box up or trade, these are it. You can see some other amazing, easy holiday ideas over at my post about my Easy Festive Christmas Poke Cake if you want another no-fuss winner!
Perfect for Christmas Cookie Exchange Ideas
Because they are perfectly bite sized and hold their shape so well once the chocolate coating sets, these little guys are amazing for swaps. No one wants broken cookies when they trade, right? These little truffles stay snug. They travel beautifully inside cupcake liners in a flat container, making them the ultimate low-stress item to bring to any party or office cookie exchange. They always get snatched up first!
Gathering Ingredients for Grinch Oreo Balls
Okay, let’s talk supplies! The beauty of **Grinch Oreo Balls** is that the core filling is so simple—it’s just two things! You absolutely need one package of Oreo cookies—and by that, I mean crush the *whole thing*, filling and all, unless you like a dry truffle mix. Then, you need 8 ounces of cream cheese, and listen close, it must be fully softened. Taking it out of the fridge an hour early is non-negotiable for getting that smooth dough texture we need. If you want to see how I use Oreos in a totally different way, check out this amazing Oreo Pound Cake Recipe!
For the colorful coating, we usually go with green candy melts. They melt like a dream compared to regular chocolate chips, which can get so thick and seize up on you if you try to push them. But hey, if you want a slightly different flavor profile, try swapping in Red Velvet Oreos for a fun color surprise inside; it makes for lovely Red Velvet Oreo Desserts. You can find the full list of what you need in the recipe card, but knowing what to watch out for during ingredient prep is half the battle!
Ingredient Notes and Substitutions for Festive Oreo Desserts
When selecting your coating, Candy Melts are my top pick for easy home dipping. If you do use white chocolate chips instead, you might need a tiny bit more oil because they are temperamental. Speaking of oil, I always sneak in a tiny teaspoon of coconut oil when I melt my coating. Trust me on this one—it makes the finished shell shatter beautifully instead of being too hard, and it helps thin everything out perfectly for dipping those adorable little Grinch Themed Food creations!
Step-by-Step Instructions for Making Grinch Oreo Balls
Alright, buckle up, because this is where the fun really starts! Making these **Grinch Oreo Balls** is broken down pretty simply, but remember my mantra: when it comes to no-bake treats, chilling is your best friend. Don’t rush the refrigeration steps, or you’ll end up with sticky messes that look more like melted green blobs than the Grinch’s heart, and we definitely don’t want that!
First things first, we need those cookies totally pulverized. If you have a food processor, just pulse that whole package of Oreos until they look like the finest sand you’ve ever seen. Now, if you don’t have a processor—and I certainly didn’t when I first started out—get a sturdy Ziploc bag, put those cookies in there, and smash away with a rolling pin! It’s a fantastic stress reliever, honestly. I always feel like I’m chasing away holiday stress while making my easy no-bake Oreo balls base!
Mixing and Chilling the No Bake Oreo Balls Base
Once you have your fine crumbs, dump them into a big bowl. Now, bring in that softened cream cheese. I mean *softened*—room temperature soft, not “I microwaved it for three minutes” soft! Use a spatula or just your clean hands to work everything together until you have a uniform, dense dough. It should feel surprisingly firm. Roll these right away into little balls, about an inch each. You should get around 25 of these guys. Line them up on parchment paper because they will stick to anything else!
This next part is crucial for successful dipping: Into the refrigerator they go for a solid 30 minutes, minimum. If your kitchen is warm, go longer! Having those **No Bake Oreo Balls** nice and cold prevents them from breaking apart or melting into the warm coating.
Melting the Coating and Dipping Your Grinch Themed Food
While things are chilling, it’s time for the green magic. Melt your green candy melts according to the package directions. I almost always use the microwave because it’s fast, but you must use short bursts—30 seconds at a time—stirring well in between each blast. If you forget to stir, the edges scorch instantly! Remember that optional teaspoon of coconut oil I mentioned? Stir that in now if you’re using it. It makes the green coating ridiculously smooth.
Once your balls are chilled and your coating is silky, it’s dipping time. Use a fork or even a toothpick inserted gently into the ball to lower it completely into the green goo. Lift it out, let the excess drip off by gently shaking the fork over the bowl, and then slide it onto your parchment paper. If you use a toothpick, you can pull it out quickly and use a second utensil to smooth that little hole left behind.
Adding the Grinch Heart Detail to Your Cute Christmas Desserts
This is my favorite part because it brings the whole ‘Grinch’ theme to life! The second the ball hits the parchment paper, you need to work fast. Before that green shell has even started to firm up, take one tiny red heart sprinkle—or a tiny piece of red M&M if you prefer—and gently press it right onto the top, dead center. That little pop of red is what makes these such Cute Christmas Desserts!

If you wait even a minute too long, the candy coating catches, and you end up trying to force the heart on, which usually ends in smudging your beautiful green job. So, work quickly, ball by ball! Once they are all decorated, let them sit out at room temperature for about 15 minutes or pop them back into the fridge for 10 minutes to set that final, glossy coat.
Tips for Perfect Grinch Oreo Balls Every Time
Now that you’ve made the base and dipped them, let’s talk about making sure those **Grinch Oreo Balls** look absolutely professional! Even with simple recipes, little things can go wrong—like melting mishaps or dough that just won’t cooperate. Since I’ve made enough of these to supply the entire North Pole, I’ve learned a few tricks that guarantee success and keep them looking vibrant for your holiday table. We want those shells smooth and crack-free!
Troubleshooting Common Issues with Festive Oreo Desserts
The most common issue people run into when making **No Bake Oreo Balls** (any kind!) is the consistency of the filling before chilling. If your mixture feels too soft, almost greasy, and won’t quite stay rolled, don’t panic! It means your cream cheese was too warm or maybe your Oreos were one of the ones with extra filling. Just scrape that too-soft dough onto plastic wrap, wrap it up tight, and let it chill for an extra 15 to 20 minutes. That little bit of extra cold time is usually enough to firm it up for rolling.

What if the melted coating decides to turn against you? If your green candy melts seize up and get thick and grainy, it usually means a tiny bit of steam or water got into them—that’s the enemy of melting chocolate! If you are using candy melts, often you can save them by stirring in a teaspoon of vegetable shortening or more coconut oil; it loosens them right back up so you can still dip your **Festive Oreo Desserts**. If you need a truly smooth frosting recipe for piping, check out my thoughts on the Best Vanilla Buttercream!
Finally, if you notice little hairline cracks appearing in the green shell after they’ve set, it’s usually a temperature shock. The contrast between the cold ball and the warm coating was too extreme. Next time, pull your chilled truffle balls out about five minutes before you start dipping so they aren’t ice-cold, just very firm. That slight warming gives the coating a better grip!
Storage and Making Ahead for Easy Christmas Snacks
One of the greatest things about making **Grinch Oreo Balls** is that they fall squarely into the category of **Make Ahead Christmas Desserts**! This is such a lifesaver when you are trying to juggle everything else during the holiday rush, right? Since these treats don’t actually bake, they are designed to keep wonderfully.
Once your little Grinches are fully set—meaning the green coating is hard and dry—you want to store them correctly to keep that crunchy coating intact and the inside delightfully chewy. Grab an airtight container. I mean *airtight*! If air gets to them, they can dry out a bit faster, and we hate losing that moisture factor.
You must keep them refrigerated. They are perfectly safe on the counter for a day, maybe, but honestly, the cream cheese filling likes the cold, and it keeps that chocolate shell firm. I’ve tested this extensively (for science, of course!), and these **Easy Christmas Snacks** stay absolutely perfect and delicious in the fridge for up to one full week. That means you can make a giant batch the weekend before Christmas and already feel ahead of the game!
If you like to freeze things way ahead, they freeze well too! Just make sure you layer them with wax paper between the layers so the green coating doesn’t stick to itself. When you are ready to serve them, just transfer them to the fridge to thaw overnight. They taste just as fresh as the day you made them. For more easy no-bake inspiration that holds up well, you have to check out my recipe for Ultimate No-Bake Oreo Ice Cream Pie!
Serving Suggestions for Grinch Oreo Balls
Once you have your gorgeous, bright green treats set and firm, the final step is deciding how to present these little works of holiday art! These **Grinch Oreo Balls** are the definition of perfect **Bite Sized Holiday Sweets**. They disappear fast, so the key is making sure they are visible and easy to grab when guests arrive.
Presentation-wise, presentation is key during the holidays. I always arrange mine on a simple white platter to make that vibrant green color really pop! You can line the platter itself with some crumpled green and red tissue paper to give it a little festive bed. It just looks so much more intentional than just sticking them on a regular plate.
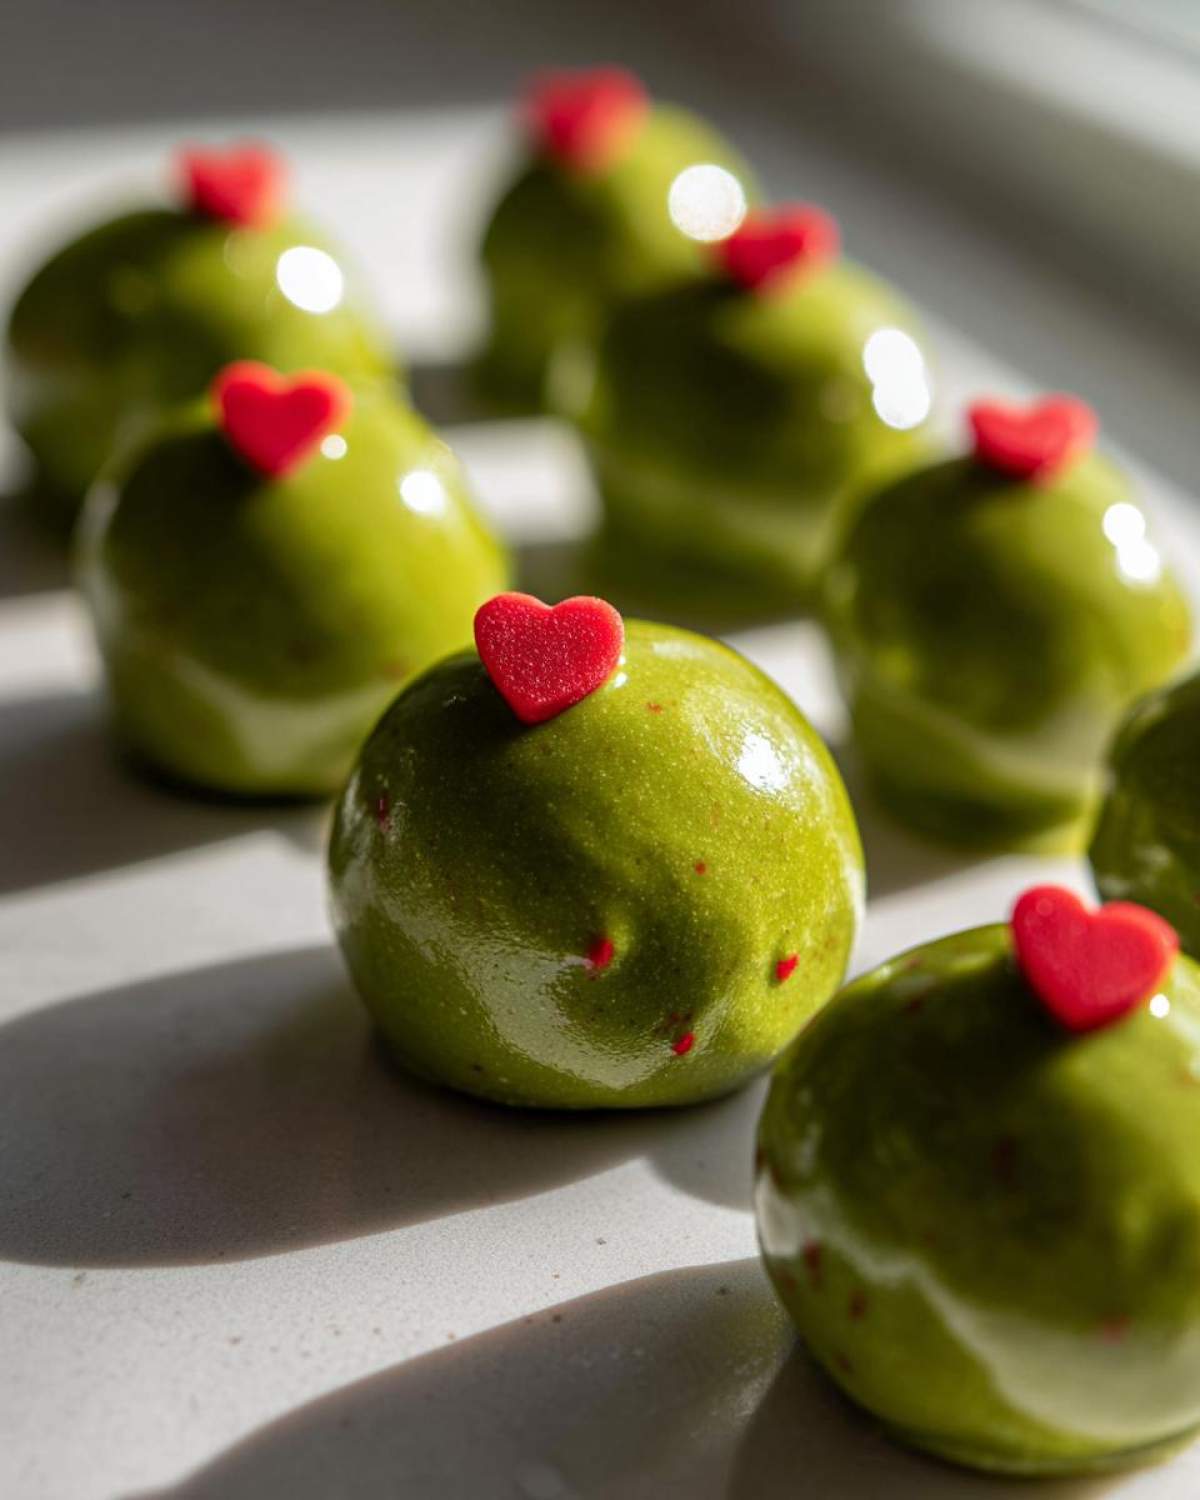
If you are serving these alongside other baked goods—like my famous Christmas Sugar Cookie Bars—make sure the Grinch Balls are easy to spot. Their whimsical nature demands attention! For an extra touch, especially if serving on a dessert buffet, you could tuck a tiny sprig of fresh rosemary near the edge of the tray to mimic a tiny bit of pine foliage—it adds a lovely, subtle scent, too!
They are also simply marvelous packaged up as small gifts. Pop three or four into a small cellophane bag, tie it off with some curling ribbon in red or green, and you’ve instantly got a hostess gift or a sweet treat for the mail carrier or teachers. Honestly, these **Grinch Oreo Balls** are so easy to make and so much fun to look at, they elevate any holiday spread without needing a ton of extra effort from you!
Frequently Asked Questions About Grinch Oreo Balls
I always get asked the same few things when people see these little green guys popping up in my kitchen! Since these **Grinch Oreo Balls** are such a hit, I figured I’d lay out the answers to the most frequent questions I see in the comments. It’s all about making sure your experience is as smooth as the melted coating!
Can I make Christmas Truffles Recipe variations?
Oh, absolutely, you can play with these! While the classic recipe uses regular chocolate Oreos for that dark center, if you check the notes section of the recipe, I mention that using Red Velvet Oreos is a fantastic way to get a surprise burst of red inside, making them even more festive and playing right into those Red Velvet Oreo Desserts.
But here’s another little trick I love: sometimes, right when I’m mixing the cream cheese into the crumbs, I stir in just half a teaspoon of peppermint extract! It gives the entire truffle a lovely, cool minty flavor that works perfectly with the chocolate. It turns these into a unique take on a classic Cookies and Cream Puppy Chow but in truffle form!
What is the best way to get the green color for these Green Candy Melt Treats?
That amazing, vibrant green is what makes them pop, so getting the color right for these Green Candy Melt Treats is important! My number one recommendation, hands down, is to buy good quality green candy melts. They are already colored, they melt beautifully (especially if you add just a tiny bit of coconut oil like I mentioned earlier), and they set up hard and shiny, which is exactly what you want for a sturdy truffle shell.
If you only have plain white chocolate chips, you can definitely use those! But you *must* use gel food coloring, not the liquid drops you use for baking cakes. Liquid coloring has water, which makes the chocolate seize up immediately. Stir in the gel coloring while the white chocolate is still warm. A little goes a long way; you want a nice, deep cave-green color!
Do I have to use a food processor to crush the Oreos?
No, you absolutely do not! While the food processor is the fastest and gives you the most consistent fine crumb, I have made batches of these **No Bake Oreo Balls** when I was living in apartments where I didn’t want the noise—or the cleanup! Like I said in the instructions, just toss the Oreos into a heavy-duty Ziploc bag, press out the air, and use a rolling pin or even the bottom of a heavy mug to crush them down. You just want to avoid big chunks of cookie that won’t mix smoothly with the cream cheese.
Can these Grinch Oreo Balls be made dairy-free?
That’s a great question for all my plant-based bakers! Yes, you can definitely adapt these! For the base, you’d need to swap the traditional Oreos for the vegan version (most of them are accidentally vegan, but double-check the label!) and use a good quality vegan cream cheese substitute. For the coating, look for specific dairy-free green candy wafers or use a high-quality white chocolate alternative specifically made without milk ingredients.
How long do the red heart sprinkles need to stick?
The secret here is timing! You only have a tiny window to get that little heart to stay put before the coating dries. As soon as you place the dipped ball on the parchment paper, immediately press that little heart on top. If you wait more than about 15 seconds, the surface hardens slightly, and the heart either won’t stick or you’ll have to press too hard and smash the truffle a bit. Work quickly while the green coating is still wet and glossy!
Estimated Nutritional Data for Grinch Oreo Balls
I know even when we’re making fun, festive, and yes, totally decadent treats like these **Grinch Oreo Balls**, some of us like to keep an eye on what we’re serving! Since these are no-bake and involve a fair amount of chocolate coating, they are definitely a holiday indulgence, but they are perfectly portion-controlled!
I pulled together the estimated nutritional breakdown below based on the standard ingredients used in this recipe. Just remember, this is an estimate serving one ball, and your actual numbers will swing a little depending on the brand of Oreos or candy melts you grab. It’s always better to treat this as a guideline rather than strict medical data!
- Serving Size: 1 ball
- Calories: 150
- Sugar: 15g (Yes, definitely a treat!)
- Sodium: 85mg
- Fat: 9g
- Saturated Fat: 5g
- Trans Fat: 0g
- Carbohydrates: 16g
- Protein: 1g
See? Perfectly portioned little bites of Christmas cheer! Everything is always better in moderation during the holidays, and these little truffles are no exception. Just enjoy them when you serve them up!
Share Your Grinch Inspired Recipes Creations
Well, that’s it! You’ve officially made some fantastic **Grinch Oreo Balls**! I always feel such a rush when I see these little guys finished; they just capture the fun of the season, don’t they? Now that you’ve successfully navigated the crushing, chilling, and dipping, I really want to see what you came up with!
Did you get little hearts perfectly centered? Did you try the Red Velvet Oreo trick? Please, please, snap a picture and tag me on social media! Seeing your **Grinch Inspired Recipes** successes is truly the best reward for me. It really brings me so much joy to know my kitchen advice is ending up on your holiday tables.
If you loved how easy and fun these were—and trust me, they are perfect for gifting alongside my famous Fudgy Chocolate Crinkle Cookies—do me a huge favor and leave a star rating right down below! Those little ratings really help other folks find these easy, festive recipes when they are planning their holiday menus.
And hey, if you’re looking for even more inspiration for **Whimsical Holiday Food** and treats that are bright, fun, and delicious throughout the whole month of December, you have to check out what I have pinned over on my Pinterest account. We pin the best, cutest recipes weekly! You can find us here on our Pinterest account for endless holiday inspiration!
PrintEasy Grinch Oreo Balls (No-Bake Christmas Truffles)

Make these adorable Grinch Oreo Balls for a fun, no-bake holiday treat. These festive Christmas truffles use crushed Oreos and cream cheese, coated in bright green candy melts, and topped with a tiny red heart.
- Prep Time: 20 min
- Cook Time: 5 min
- Total Time: 55 min
- Yield: 26 servings 1x
- Category: Dessert
- Method: No-Bake
- Cuisine: American
- Diet: Vegetarian
Ingredients
- 1 package (14.3 oz) Oreo cookies (about 36 cookies)
- 8 ounces cream cheese, softened
- 12 ounces green candy melts or white chocolate chips with green food coloring
- 1 teaspoon coconut oil (optional, for smoother melting)
- Small red heart sprinkles or red M&M candies for the heart
Instructions
- Place the Oreo cookies into a food processor and pulse until you have fine crumbs. If you do not have a food processor, place them in a sealed plastic bag and crush them with a rolling pin.
- Transfer the Oreo crumbs to a medium bowl. Add the softened cream cheese. Mix with a rubber spatula or clean hands until the mixture is completely combined and forms a thick dough.
- Roll the dough into small balls, about 1 inch in diameter. You should get about 24 to 28 balls. Place the balls on a baking sheet lined with parchment paper.
- Chill the Oreo balls in the refrigerator for at least 30 minutes. This step helps them firm up before dipping.
- Melt the green candy melts according to package directions. If using, stir in the coconut oil for a smoother consistency. You can melt them in the microwave in 30-second intervals, stirring between each interval.
- Dip each chilled Oreo ball into the melted green coating, ensuring it is fully covered. Gently tap off any excess coating.
- Place the coated ball back onto the parchment-lined baking sheet.
- Before the coating sets, immediately press one small red heart sprinkle or candy onto the top center of each ball to resemble the Grinch’s heart.
- Allow the Grinch Oreo Balls to set completely at room temperature, or speed up the process by placing them back in the refrigerator for about 15 minutes.
- Serve these cute Christmas desserts immediately or store them in an airtight container in the refrigerator.
Notes
- If you want a slightly different flavor, substitute regular Oreos with Red Velvet Oreos for a subtle red tint in the center.
- For easy dipping, use a toothpick inserted into the ball, dip it, and then carefully pull the toothpick out, smoothing the hole with another utensil if needed.
- These make excellent make ahead Christmas desserts; they keep well for up to one week in the refrigerator.
Nutrition
- Serving Size: 1 ball
- Calories: 150
- Sugar: 15
- Sodium: 85
- Fat: 9
- Saturated Fat: 5
- Unsaturated Fat: 4
- Trans Fat: 0
- Carbohydrates: 16
- Fiber: 0
- Protein: 1
- Cholesterol: 10