The Complete 7-Day Guide: How to Make a Sourdough Starter From Scratch
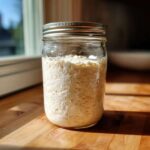
Start your artisan baking journey today! Follow this simple, day-by-day guide to cultivate your own active sourdough starter using only flour and water. This is the best sourdough base for beginners.
- Prep Time: 10 min per day
- Cook Time: 0 min
- Total Time: 7 days (active daily attention)
- Yield: About 100g active starter 1x
- Category: Baking Base
- Method: Culturing
- Cuisine: American
- Diet: Vegetarian
Ingredients
Scale
- 100g Whole Wheat or Rye Flour (for initial days)
- 100g Unbleached All-Purpose Flour (for later days)
- 100g Unchlorinated Water (room temperature)
Instructions
- Day 1: Initial Mix. Combine 50g of whole wheat or rye flour with 50g of room temperature water in a clean glass jar. Stir well until no dry flour remains. Cover loosely (a coffee filter or loose lid works) and let it sit at room temperature (68-75°F) for 24 hours.
- Day 2: Rest. Do not feed today. You might see a few small bubbles or nothing at all. This is normal for your new wild yeast culture.
- Day 3: First Feeding. Discard half of the mixture (about 50g). Add 50g of all-purpose flour and 50g of water to the remaining starter. Mix thoroughly, cover loosely, and wait 24 hours. You should see some activity now.
- Day 4: Twice Daily Feeding Begins. Discard half of the starter. Feed the remainder with 50g all-purpose flour and 50g water. Mix well. Repeat this discard and feed process again 12 hours later. Look for doubling in size.
- Day 5: Building Strength. Continue the twice-daily feeding schedule (discard half, feed 50g flour + 50g water). Activity should increase significantly. If you see mold or pink/orange streaks, discard the entire batch and start over.
- Day 6: Consistency Check. Feed twice today. Your active sourdough starter should consistently double in volume within 4-8 hours after feeding. If it is sluggish, continue the twice-daily feeding.
- Day 7: Ready to Bake. If your starter reliably doubles and shows many bubbles after feeding, it is ready to use for baking sourdough bread. You have successfully cultivated your homemade wild yeast!
Notes
- Use filtered or bottled water if your tap water is heavily chlorinated, as chlorine can inhibit yeast growth.
- A consistent room temperature helps the process; aim for 70°F if possible.
- Once mature, you can switch to feeding only once a day if storing on the counter, or move it to the refrigerator for weekly feeding (sourdough maintenance).
- If you have extra starter, look up recipes for sourdough discard use!
Nutrition
- Serving Size: 100g (Unbaked)
- Calories: 200
- Sugar: 0.5
- Sodium: 1
- Fat: 0.5
- Saturated Fat: 0.1
- Unsaturated Fat: 0.4
- Trans Fat: 0
- Carbohydrates: 40
- Fiber: 2
- Protein: 5
- Cholesterol: 0