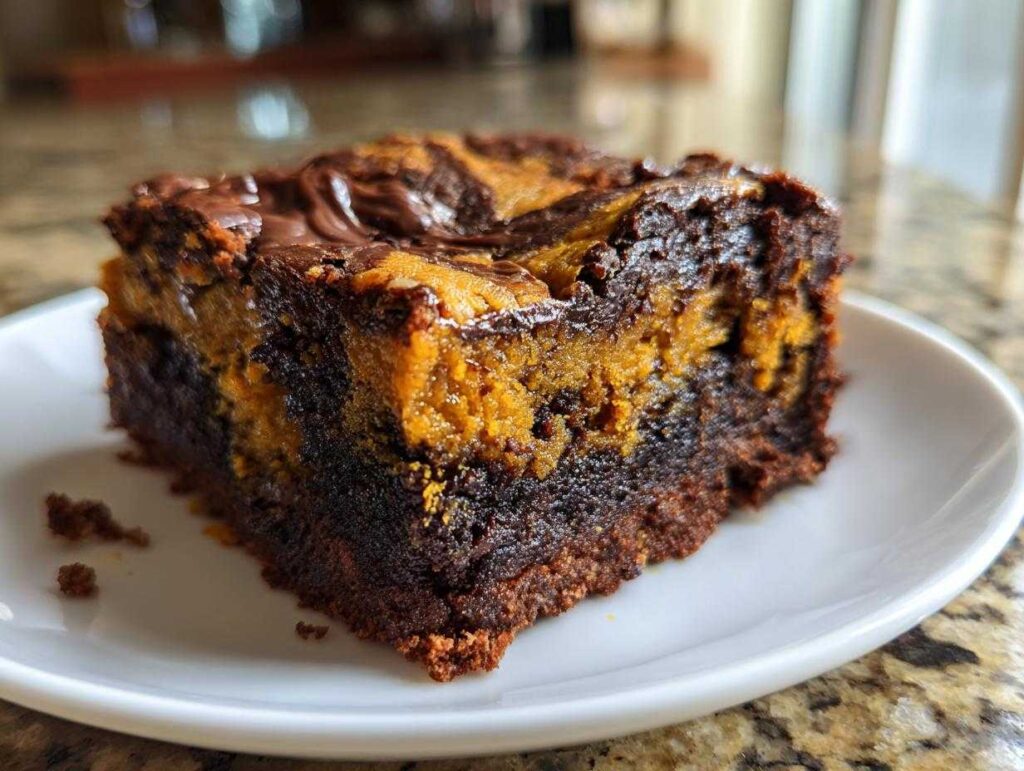
You know that feeling when you take your first bite of a pumpkin brownie and the rich chocolate swirl just melts in your mouth? That’s exactly what happened to me last fall when I whipped up a batch for my kid’s school bake sale. The whole kitchen smelled like cinnamon and chocolate, and by the time I finished swirling that batter, I knew these weren’t just any brownies—they were my new fall obsession. These pumpkin brownies are insanely fudgy, with just the right amount of pumpkin spice peeking through ribbons of melted chocolate. Perfect for Halloween parties, Thanksgiving gatherings, or, let’s be honest, sneaking a midnight snack.

Growing up, my mom always made pumpkin bread in October, but it wasn’t until I started experimenting that I realized pumpkin and chocolate are a match made in dessert heaven. The best part? These bars freeze like a dream, so you can stash a few away for those sudden sweet cravings (trust me, you’ll thank me later). And if you’re prepping for a bake sale, just chill them before slicing—you’ll get those clean, Instagram-worthy squares every time.
- Why You'll Love These Pumpkin Brownies
- Ingredients for Pumpkin Brownies with Chocolate Swirl
- How to Make Pumpkin Brownies Step by Step
- Tips for Perfect Pumpkin Brownies Every Time
- Pumpkin Brownies Variations and Substitutions
- How to Store and Freeze Pumpkin Brownies
- Pumpkin Brownies Nutrition Information
- Frequently Asked Questions About Pumpkin Brownies
- More Fall Baking Ideas You’ll Enjoy
Why You’ll Love These Pumpkin Brownies
Trust me, once you try these pumpkin brownies, you’ll never go back to plain chocolate again. Here’s why they’re absolutely irresistible:
- Fudgy perfection: The combo of melted butter and pumpkin puree creates the most decadent, melt-in-your-mouth texture you can imagine. Your fork will glide through these like a hot knife through butter!
- Easy peasy: No fancy techniques here—just mix, swirl, and bake. Perfect for when you need last-minute treats for unexpected guests (or emergency chocolate cravings).
- Freezer magic: I stash half the batch every time because they taste just as good thawed as fresh. Great for meal planning your dessert rotation!
- Flavor harmony: The cinnamon and nutmeg play beautifully against the rich chocolate swirl—not too spicy, not too sweet, just pure autumn bliss.
- Bake sale superstar: Chilled slices come out perfectly clean, so your swirls stay Instagram-pretty in those little cellophane bags.
I might be biased, but these have become my go-to gift for neighbors, teachers, and anyone who needs a pumpkin spice hug in edible form.
Ingredients for Pumpkin Brownies with Chocolate Swirl
Okay, let’s get to the good stuff – what makes these pumpkin brownies so ridiculously good. I’ve learned through many (many) batches that quality ingredients really make a difference here. Here’s exactly what you’ll need, grouped so you don’t waste time hunting through your pantry mid-recipe:
Wet Ingredients
- 1 cup pumpkin puree – Not pumpkin pie filling! We want plain pumpkin puree, no added spices or sugar. Libby’s is my go-to brand.
- ½ cup unsalted butter, melted – I let mine soften at room temp for about 30 minutes before melting. This makes it mix better with the sugar.
- 1 cup granulated sugar – Just regular white sugar works perfectly here.
- 2 large eggs – Seriously, large eggs. The smaller ones throw off the moisture balance.
- 1 tsp vanilla extract – The real stuff, please! That imitation vanilla won’t do these brownies justice.
Dry Ingredients
- 1 cup all-purpose flour – Measure by spooning into the cup and leveling off, don’t scoop straight from the bag.
- ½ cup cocoa powder – Dutch-processed gives the richest flavor, but natural works too.
- 1 tsp cinnamon – The secret weapon that makes the pumpkin sing.
- ½ tsp nutmeg – Freshly grated if you can – it makes a noticeable difference.
- ¼ tsp salt – Just a pinch to balance all that sweetness.
For the Chocolate Swirl
- ½ cup chocolate chips, melted – Semi-sweet gives the perfect sweetness, but dark chocolate lovers can go up to 70% cacao. I melt mine in 15-second bursts in the microwave – careful not to burn it!
See? No weird ingredients here – just pantry staples that come together into something magical. Now let’s get baking!
How to Make Pumpkin Brownies Step by Step
Alright, let’s get swirling! The first time I made these, I swirled so aggressively I ended up with chocolate mudslides—lesson learned. Now I know exactly how to get those dreamy ribbons just right. Follow these steps, and you’ll be a pumpkin brownie pro in no time.
- Prep like a boss: First, crank that oven to 350°F (175°C). Line your 9×9 inch pan with parchment paper, leaving little handles on the sides—you’ll thank me when you’re lifting out those perfect squares later!
- Whisk the wet stuff: In your favorite mixing bowl (I use my grandma’s old yellow one), beat together the pumpkin puree, melted butter, sugar, eggs, and vanilla. Go at it with a wooden spoon until it’s silky smooth, about 1-2 minutes. No stand mixer needed here—we don’t want to overdo it!
- Fold in the dry team: Dump in all the dry ingredients—flour, cocoa powder, cinnamon, nutmeg, and salt. Gently fold with a rubber spatula just until the flour disappears. A few streaks are fine! Overmixing = tough brownies, and nobody wants that.
- Batter up: Pour your gorgeous chocolatey batter into the prepared pan, smoothing the top with your spatula. Now for the FUN part—take that melted chocolate (I use this foolproof melting method) and drizzle it all over in zigzags.
- Swirl magic: Grab a butter knife and lightly drag it through the batter, making figure-8 patterns. Less is more here—3-4 passes max! You want defined swirls, not a muddy mess.
- Bake to perfection: Slide it into the oven for 25-30 minutes. The edges will pull away slightly, and a toothpick should come out with moist crumbs (not wet batter). Pro tip: Rotate the pan halfway for even baking!
- Patience, grasshopper: Let the pan cool completely on a rack—about 1 hour. I know it’s torture, but slicing warm brownies is a one-way ticket to Crumble City. For extra-clean cuts, chill them for 30 minutes first.
See? Easy as… well, pumpkin pie! The hardest part is waiting for them to cool before diving in. But trust me, that first bite of fudgy pumpkin-chocolate heaven is so worth the wait.
Tips for Perfect Pumpkin Brownies Every Time
Okay, here’s the real talk—after three dozen batches (yes, I counted), I’ve nailed down the tricks for pumpkin brownie perfection. These little tweaks make ALL the difference between good and “oh-my-gosh-can-I-have-the-recipe” amazing.
- Chill for picture-perfect slices: Pop those cooled brownies in the fridge for 30 minutes before cutting. The chocolate firms up, and you’ll get razor-sharp edges—crucial for bake sales or when you’re feeling fancy. I use a chef’s knife dipped in hot water and wiped dry between cuts.
- Cocoa matters: Skip the dusty old tin in the back of your pantry. Splurge on rich Dutch-process cocoa—it gives that deep chocolate flavor that balances the pumpkin beautifully. My personal favorite? A brand with a red label—you’ll know it when you see it.
- Spice it your way: Not into super-spicy desserts? Start with half the cinnamon and nutmeg, then taste the batter (raw eggs be darned—we live dangerously here). You can always add more. Or go wild and swap in pumpkin pie spice from my pumpkin cheesecake muffins recipe!
- Freezer savvy: These freeze like champs! Slice them first, then layer between parchment in an airtight container. They’ll keep for 3 months, but let’s be real—they’ll disappear by Thanksgiving. Thaw at room temp or zap one in the microwave for 15 seconds when cravings strike.
There you go—the secrets behind my most requested fall treat. Now go forth and bake with confidence!
Pumpkin Brownies Variations and Substitutions
Oh, the possibilities! Once you’ve mastered the basic pumpkin brownie recipe (which is downright heavenly as-is), feel free to get creative. Here are my favorite ways to mix things up based on what’s in my pantry or who’s coming over:
- Nutty delight: Fold in ½ cup chopped walnuts or pecans with the dry ingredients. The crunch plays so nicely against the fudgy texture—my uncle insists they’re not complete without walnuts now!
- Double chocolate: Swap that cocoa powder for an extra ½ cup chocolate chips melted right into the batter. It’s like a chocolate lava cake and pumpkin bread had a baby. Decadent doesn’t even begin to cover it.
- Gluten-free goodness: Use a 1:1 gluten-free flour blend instead of all-purpose. My friend with celiac says they’re indistinguishable from the original—just don’t skip the xanthan gum if your blend doesn’t include it.
See? Whether you’re catering to dietary needs or just feeling adventurous, these brownies are ready for your personal touch!
How to Store and Freeze Pumpkin Brownies
Listen, these pumpkin brownies disappear fast in my house, but when I do manage to save some (usually by hiding them behind the frozen peas), here’s how I keep them tasting fresh:
- Counter storage: At room temp, they stay perfect for 3 days in an airtight container. Just tuck a slice of bread in there—it keeps them miraculously moist!
- Fridge lifespan: They’ll last up to a week refrigerated, though the texture gets denser (in the best fudgy way).
- Freezer magic: Individually wrap squares in parchment, then freeze in a ziplock for up to 3 months. Thaw overnight in the fridge or microwave for 20 seconds—good as fresh!
Pro tip: If you’re freezing for meal planning, label the bag with the date using washi tape. My future self always thanks past me when pumpkin cravings strike at midnight!
Pumpkin Brownies Nutrition Information
Just to keep it real – nutrition can vary based on your exact ingredients and portion sizes (are we counting that corner piece with extra swirl as one serving or two?). While I don’t have a lab in my kitchen, these brownies pack pumpkin’s vitamin A, cocoa’s antioxidants, and a whole lot of joy. Remember, balance is key – enjoy them with your morning coffee or after dinner, guilt-free!
Frequently Asked Questions About Pumpkin Brownies
I get it – even the simplest recipes can bring up questions! After years of making these pumpkin brownies (and fielding texts from friends mid-bake), here are the answers to the most common head-scratchers:
Can I use pumpkin pie spice instead of cinnamon and nutmeg?
Absolutely! Swap the cinnamon and nutmeg for 1½ teaspoons of pumpkin pie spice. It’ll give that classic fall flavor profile. I sometimes add an extra pinch of cinnamon anyway because… well, I’m extra like that. Find more inspiring pumpkin ideas on Pinterest!
Why won’t my chocolate swirl stay defined after baking?
Ah, the classic “muddy swirl” dilemma! Two culprits: over-swirling (3-4 knife passes max!) or butter that was too hot when melted. Let your melted chocolate cool slightly before drizzling – it should be warm, not lava-hot. One big zigzag drizzle works better than lots of little ones.
How do I get those bakery-perfect clean slices?
Chill those babies! After cooling completely, pop them in the fridge for 30 minutes. Use a sharp knife dipped in hot water and wiped dry between cuts. Works like a charm every time – crucial for bake sales or gift boxes.
Can I make these gluten-free?
You bet! Substitute the all-purpose flour with a 1:1 gluten-free blend (I love King Arthur’s). The texture might be slightly denser, but still delicious. Bonus tip: Add ¼ tsp xanthan gum if your blend doesn’t include it.
Do these really freeze well?
Like little pumpkin-chocolate time capsules! Individually wrap cooled squares in parchment, then freeze in airtight containers. They’ll stay perfect for 3 months – not that they’ll last that long in my house. Thaw at room temp or microwave briefly for that just-baked feel.
More Fall Baking Ideas You’ll Enjoy
Can’t get enough pumpkin-chocolate goodness? Me either! Here are two of my other must-make treats this season:
- Pumpkin Chocolate Chip Muffins – Like these brownies in portable form, with melty pockets of chocolate in every bite.
- Pumpkin Chocolate Chip Bread – My Sunday afternoon go-to—perfectly spiced and stays moist for days (if it lasts that long).
Pretty soon your whole kitchen will smell like a pumpkin spice latte factory—enjoy the delicious chaos!
PrintPumpkin Brownies with Chocolate Swirl

Fudgy pumpkin brownies with a chocolate swirl, perfect for fall bake sales. These bars are moist, freezer-friendly, and easy to slice.
- Prep Time: 15 min
- Cook Time: 30 min
- Total Time: 45 min
- Yield: 12 servings 1x
- Category: Dessert
- Method: Baking
- Cuisine: American
- Diet: Vegetarian
Ingredients
- 1 cup pumpkin puree
- 1/2 cup unsalted butter, melted
- 1 cup granulated sugar
- 2 large eggs
- 1 tsp vanilla extract
- 1 cup all-purpose flour
- 1/2 cup cocoa powder
- 1 tsp cinnamon
- 1/2 tsp nutmeg
- 1/4 tsp salt
- 1/2 cup chocolate chips, melted
Instructions
- Preheat oven to 350°F and line a baking pan with parchment paper.
- Mix pumpkin puree, melted butter, sugar, eggs, and vanilla in a bowl.
- In another bowl, whisk flour, cocoa powder, cinnamon, nutmeg, and salt.
- Combine wet and dry ingredients until just mixed.
- Pour batter into the pan and drizzle melted chocolate on top. Swirl with a knife.
- Bake for 25-30 minutes or until a toothpick comes out clean.
- Cool completely before slicing.
Notes
- For clean slices, chill the brownies before cutting.
- Freeze leftovers for up to 3 months.
- Use high-quality cocoa for the best flavor.
Nutrition
- Serving Size: 1 brownie
- Calories: 180
- Sugar: 15g
- Sodium: 60mg
- Fat: 8g
- Saturated Fat: 5g
- Unsaturated Fat: 2g
- Trans Fat: 0g
- Carbohydrates: 25g
- Fiber: 2g
- Protein: 3g
- Cholesterol: 45mg